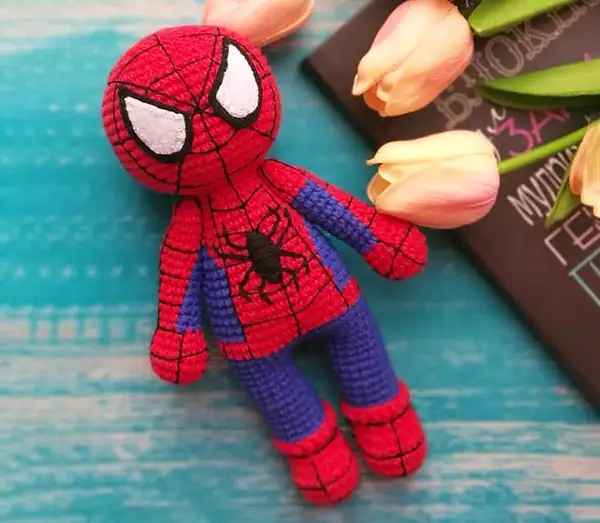
Tiny Spidey Amigurumi — Crochet Pattern
What makes it special
Made with Love
This pattern gives you every round and stitch math in clear order, so you can follow along exactly. It’s written in US crochet terms and designed for a compact toy with a slightly stylized head and a squat body so Spidey sits well. The separate sewn mask overlay lets you embroider the webbing cleanly or place felt eyes, and the legs and boots attach with simple whipstitching.
Estimated Time
6–9 hours total for the whole doll. If you work slowly on embroidery or detailed sewing, allow more time. Experienced crocheters may finish faster.
Intermediate Level
Intermediate: you should be comfortable working in continuous rounds, invisible decreases (sc2tog), increasing, and basic embroidery for the web lines. Basic experience sewing small amigurumi parts is helpful.
About This Tiny Spidey Amigurumi — Crochet Pattern
This is an original, intermediate-level amigurumi pattern to make a small Spidey-inspired doll — a cuddly, poseable little hero with embroidered webbing, sewn mask overlay and bright red-and-blue color blocking. The pattern uses simple amigurumi construction (magic ring starts, single crochet in rounds, increases and decreases) and includes detailed stitch counts, shaping rounds and step-by-step assembly notes. You'll end up with a roughly 7.5–9" (19–23 cm) doll depending on your yarn and tension.
The pattern walks you through each piece: Head, Mask overlay, Body, Arms, Hands, Legs and Boots, plus tips to customize and style your Spidey.
Why this pattern? I wanted a small, display-friendly Spidey doll that’s quick to make but still has recognizable costume details. The mask overlay and embroidered webbing give the character without complicated colorwork in the round.
I designed the body to be squat and sturdy so the doll sits, and the arms are slightly flexible to pose on a shelf.
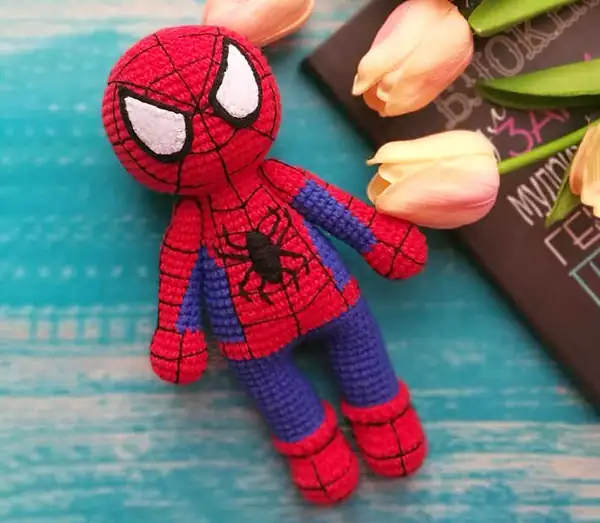
I built the shaping to be logical and gradual so the math is easy to check. Each piece begins with either a magic ring or foundation chain and ends with a clear closing round. There are 78 total rounds across the pieces, and each section is unique so you can assemble confidently.
Why You'll Love This Tiny Spidey Amigurumi — Crochet Pattern
You’ll love this pattern if you like crisp color blocking and embroidered detail. The mask overlay makes the face expressive, while the separate boots and hands mean you can mix yarn colors easily. It’s a great gift for superhero fans, and the finished doll is sturdy enough for gentle play or shelf display.
Switch Things Up
Change the color stripes (use dark red and navy blue) or make a kitty- or bunny-themed mask for a fun crossover. Swap the white eyes for felt or safety eyes, or make a taller body by adding extra straight rounds to the torso.
Common Mistakes & How to Fix Them
Abbreviations
-
01MR: Magic ring
-
02ch: chain
-
03sl st: slip stitch
-
04sc: single crochet
-
05inc: increase (2 sc in same st)
-
06dec: single crochet decrease (sc2tog)
-
07st(s): stitch(es)
-
08x: repeat
Tiny Spidey Amigurumi — Crochet Pattern
This pattern is an original amigurumi design inspired by classic red-and-blue superhero color blocking. I've included precise stitch counts and shaping so the toy will come together predictably. The mask overlay approach keeps the facial area tidy and gives space for clean embroidery work.
- Skill level
- Intermediate
- Time to make
- 6-9 hours
Materials Needed
Tap an item to tick it off your stash — the list resets when you leave the page.
-
01Main yarn: Sport/DK weight yarn, red (about 40g)
-
02Accent yarn: Sport/DK weight yarn, blue (about 40g)
-
03Contrast: Black scrap for web embroidery (small amount)
-
04White felt or white yarn for eye shapes (small scrap)
-
01Crochet hook 3.5 mm (E/4) — or adjust to match your tension
-
02Yarn needle (tapestry needle) for sewing and weaving ends
-
03Polyfill stuffing
-
04Stitch marker
-
05Small scissors
-
06Black embroidery thread or yarn for webbing
-
07Optional: 10 mm safety eyes or felt for eyes (white and black felt)
The Pattern, Round by Round
Tap a row when you finish its round — the red thread keeps your place.
Head
6 SC in magic ring (6)
INC in each st around (12)
(1 SC, INC) x6 (18)
(2 SC, INC) x6 (24)
(3 SC, INC) x6 (30)
(4 SC, INC) x6 (36)
SC around (36)
SC around (36)
SC around (36)
SC around (36)
SC around (36)
SC around (36)
(4 SC, DEC) x6 (30)
(3 SC, DEC) x6 (24)
(2 SC, DEC) x6 (18)
(1 SC, DEC) x6 (12)
DEC x6 (6). Fasten off and weave tail to close the hole. Leave a long tail for sewing the mask overlay and attaching to body.
Mask overlay (make 1)
6 SC in magic ring (6)
INC in each st around (12)
(1 SC, INC) x6 (18)
(2 SC, INC) x6 (24)
SC around (24)
SC around (24). Fasten off leaving long tail for sewing. This oval sits on the face and will be embroidered with webbing. Optionally place white felt eye shapes before sewing.
Body
6 SC in magic ring (6)
INC in each st around (12)
(1 SC, INC) x6 (18)
(2 SC, INC) x6 (24)
(3 SC, INC) x6 (30)
(4 SC, INC) x6 (36)
(5 SC, INC) x6 (42)
SC around (42)
SC around (42)
SC around (42)
SC around (42)
SC around (42)
(5 SC, DEC) x6 (36)
SC around (36)
SC around (36)
SC around (36)
(4 SC, DEC) x6 (30)
SC around (30)
(2 SC, DEC) x6 (24)
(1 SC, DEC) x6 (18)
DEC x6 (12). Fasten off leaving long tail for sewing to head. Stuff firmly before closing.
Arms (make 2)
6 SC in magic ring (6)
INC in each st around (12)
(1 SC, INC) x6 (18)
SC around (18)
SC around (18)
SC around (18)
SC around (18)
SC around (18)
(1 SC, DEC) x6 (12) - taper at wrist
SC around (12). Fasten off leaving a tail for sewing. Lightly stuff the arm and sew to body at marked shoulder placement.
Hands (make 2)
6 SC in magic ring (6)
INC in each st around (12)
SC around (12)
(1 SC, INC) x6 (18)
(1 SC, DEC) x6 (12) - form wrist base
SC around (12). Fasten off and leave tail for sewing to the arm tip. Stuff lightly if desired.
Legs (make 2)
6 SC in magic ring (6)
INC in each st around (12)
(1 SC, INC) x6 (18)
(2 SC, INC) x6 (24)
SC around (24)
SC around (24)
SC around (24)
SC around (24)
(2 SC, DEC) x6 (18)
(1 SC, DEC) x6 (12)
SC around (12)
SC around (12). Fasten off leaving long tail for sewing. Lightly stuff leg and sew to bottom of body, spacing legs evenly.
Boots (make 2) — foundation chain start
Foundation chain 6, join with sl st to form ring, 6 SC around the ring (6)
INC in each st around (12)
(1 SC, INC) x6 (18)
SC around (18)
(1 SC, DEC) x6 (12)
SC around (12). Fasten off and leave tail for sewing the boot onto the leg end. Sew boot to leg with invisible whipstitch.
Assembly Instructions
- 1. Sew the head to the body: Place the head centered on the smaller opening of the torso. Use the long tail from the body to whipstitch through head and body, pulling evenly and stuffing the neck area as you go. Secure and weave in tail.
- 2. Attach legs: Position both legs at the base of the body. Use the long tails from the legs (or a separate length of yarn) and sew with an invisible whipstitch so the doll can sit flat. Make sure spacing between legs allows the doll to sit without tipping.
- 3. Sew boots to legs: Align each boot with the end of each leg and sew around the top of the boot with the tail left on the boot piece.
- 4. Attach arms and hands: Sew hands to arm tips if made separately, then sew arms to the sides of the body at shoulder height. Use matching yarn to make neat joins. Position arms slightly forward for a natural pose.
- 5. Mask placement: Position the mask overlay centered on the head; sew only along the edges so it sits slightly raised. Alternatively glue a felt mask if you prefer no stitching on the face.
- 6. Eyes: Attach small white felt eye shapes or sew small white circles onto the mask. If using safety eyes, place them before sewing the mask on (remember safety eyes cannot be used if making for a child without removing the safety backs).
- 7. Embroider webbing: Using black embroidery thread or thin yarn, start from a center point on the mask and stitch radial lines outward, then stitch curved connecting lines to form webbing. Keep stitches even and not too tight to avoid puckering.
- 8. Final finishing: Weave in all ends securely and trim. Give the doll a final shaping by evenly distributing stuffing through body and head, and adjust posture.
Important Notes
- Gauge is not critical for amigurumi, but change hook size if your fabric is too loose and stuffing shows through.
- Work in continuous rounds (spiral) unless otherwise instructed; place a stitch marker at the first stitch of each round to track progress.
- Keep stitches tight for a neat surface and to prevent stuffing from showing.
- When embroidering the web, work lightly and test your web design on scrap fabric to get the look you want before committing it to the mask.
- For safety, omit small parts if making this doll for children under 3 years old — use embroidered or sewn-on felt eyes instead of safety eyes.
Finished Spidey: a small, stylized rescue-ready doll with embroidered webbing and removable mask overlay. Great as a gift or shelf buddy.
Frequently Asked Questions
Yes—use a thicker yarn and larger hook for a bigger doll, or a thinner yarn and smaller hook for a smaller doll. Keep in mind you may need to add or remove straight rounds on the torso and legs to maintain proportions.
Yes. Embroidering the web before sewing the mask overlay to the head can be easier because you can lay the mask flat. If you prefer, sew the mask in place first and then embroider on the head for a slightly 3D effect.
Yes. Sew only along three sides of the mask or use tiny Velcro dots so the mask can be lifted off. If using Velcro, ensure it’s secured well and avoid small pieces for children's toys.
Use a thin embroidery thread and keep your tension light. Anchor each radial line at both ends and avoid pulling too tight. Work the curved connecting lines gently and distribute the stitches evenly.
Choose a vivid red and a medium to deep blue in the same weight for consistent gauge. Use black for webbing and white for the eye shapes. A DK/sport-weight yarn in cotton or acrylic works well for crisp color blocking.
For gentle posing, you can insert a thin pipe cleaner or flexible wire into the arms before stuffing. Be careful to secure wire ends so they won’t poke through; this is best for display items, not toys for small children.