FREE CROCHET PATTERN
Farrah Amigurumi Pattern
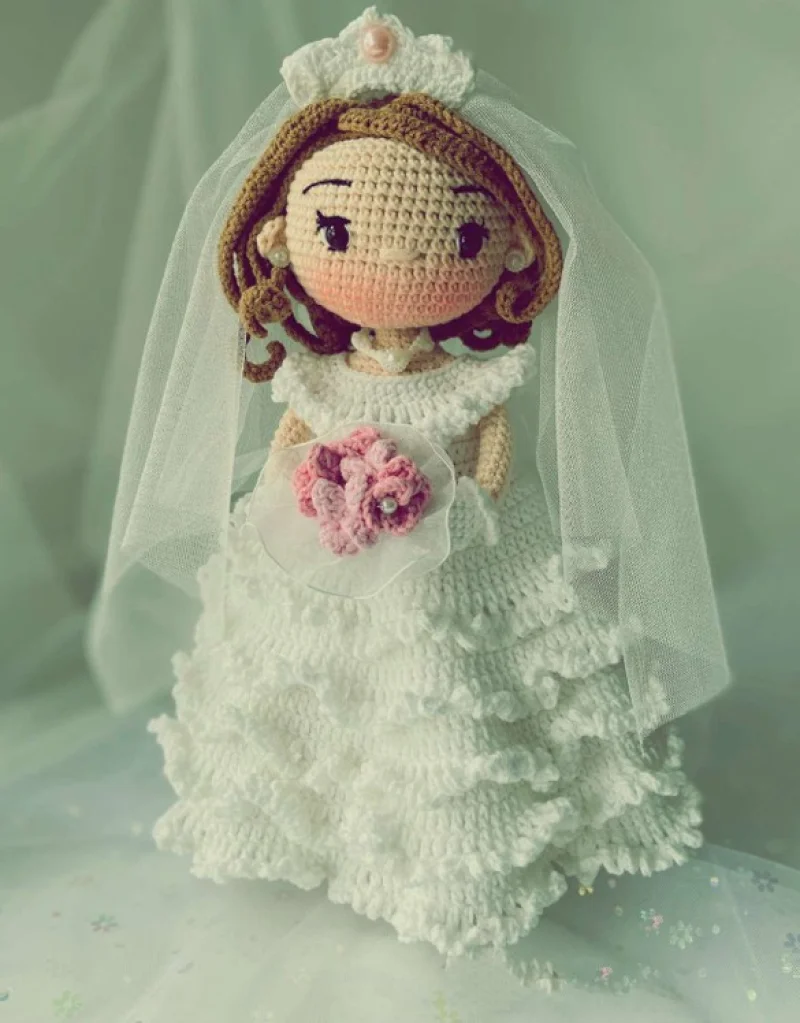
Create a beautiful bridal amigurumi named Farrah with this detailed crochet pattern. You will work charming dress ruffles, a layered wig, tiny accessories and full assembly instructions. The pattern includes step-by-step rounds, photos references and materials list so you can follow along easily. Perfect for makers who love detailed, gift-quality dolls.

Cute Companion
An adorable friend to cherish, handcrafted with love to bring comfort and joy for years to come.
ABOUT THIS PATTERN
This pattern creates a detailed bridal amigurumi doll with layered ruffle dress, wig, veil and accessories. It features step-by-step rounds for body parts, hair layers and ornate dress sections. You will learn finishing techniques for attaching a wig, sewing tiny shoes and making flowers with wire stems.
Includes full materials and tools list plus stitch abbreviations and photo references. Suitable for crocheters comfortable with rounds, increases and decreases.
WHY YOU'LL LOVE IT
I absolutely love this pattern because it brings together delicate dress details and a playful personality in a small doll. I enjoy designing layered hair that gives so much character and movement to the finished piece. Sewing the wig and adding tiny accessories like pearls and a veil always feels like dressing a tiny bride and is deeply satisfying. I hope you’ll find the same joy in assembling and finishing this doll as I did while creating it.
💡 SWITCH THINGS UP
I love how versatile this pattern is for customization; you can easily adjust colors to create different brides or fantasy characters by swapping yarn shades.
Want a simpler version? Skip some of the ruffle layers on the dress to speed up the project and create a neater skirt.
To make a mini keychain version, use thinner yarn and a smaller hook; reduce rounds proportionally and shorten the wig strands.
I often add embroidered details like hearts or initials on the dress bodice to personalize gifts for weddings or anniversaries.
Try different hair colors and braid or style the strands into buns or ponytails for a fresh look; wire inside the wig cap gives you posable styling options.
Experiment with metallic or sparkly yarn for accents on the crown or bouquet to create a glam bridal effect.
Use felt or small cardboard soles inside the shoes for sturdiness if you plan to display the doll frequently.
If you want a more durable doll for play, consider securely sewing on safety eyes and reinforcing joints with extra stitching.
I sometimes substitute the tulle veil with lace fabric or a ribbon headpiece for a vintage effect that is easier to sew in place.
Finally, mix and match pearl beads, buttons and tiny charms to create a signature accessory set that makes each doll unique.
IMPORTANT NOTES
- Use stitch markers to keep track of your rounds, especially when working spiral rounds or when changing yarn colors for sleeves and legs.
- Stuff firmly but gradually and shape as you go to avoid lumps and to achieve a smooth head and body silhouette.
- Weave in ends and secure color changes before moving to the next section; this helps maintain a neat finish when sewing pieces together.
🧶 Materials
- Jeans - Yarn Art Skin (code 73): 30g
- Jeans - Yarn Art White (code 62): 160g
- Jeans - Yarn Art Pink (code 36): 5g
- Jeans - Yarn Art Light pink (code 18): 5g
- Etrofil Jeans - Yellow (code 59): 30g
Tools Required
- Fiberfill
- 2 black safety eyes, size 10 mm
- Embroidery thread: black, white
- Tulle (50cm x 60cm)
- Gauge jewelry wire and green washi tape
- Pearl beads
- Hook size: 2.3 mm (or the size you prefer)
- Wire
- Sewing needle
- Stitch marker
- Scissors
- Pink blush makeup powder
- Pins
- Optional: wooden spoon/chopstick and clamping scissor to simplify the filling
- Silicon glue
- 3 buttons
📖 Abbreviations
- rd(s) - rounds(s)
- row(s) - row(s)
- st(s) - stitch(es)
- slst - slip stitch
- sk - skip
- ch - chain
- sc - single crochet
- hdc - half double crochet
- inc - work 2 single crochet in one stitch
- dec - decrease over 2 single crochet
- N - Bobble stitch (see referenced video)
- *...* - repeat directions following as many times as indicated
- [...] - work directions inside of square brackets into stitch as indicated
- hdc2tog - work 2 half double crochet in one stitch
- dc-inc - work 2 double crochet in one stitch
- dc2tog - decrease over 2 double crochet
- hdc-inc - work 2 half double crochet in one stitch
- BL(O) - back loop (only)
- FL(O) - front loop (only)
- WS - wrong side
- RS - right side
- Tr - treble crochet
🧩 Pattern Steps
— ARMS (make two) :
Round 1 :
6sc in the magic ring (6)
Round 2 :
6inc (12)
Round 3 :
*3sc, 1inc* crochet 3 times (15)
Round 4-Round 5 :
15sc (15)
Round 6 :
1sc , 2dec, 10sc (13)
Round 7 :
1sc, 1N, 11sc (Crochet "N": photo 1, 2, 3) (13)
Round 8 :
1sc, 1dec, 3sc, 2dec, 3sc (10)
Round 9 :
1dec, 8sc (9)
Info :
Cut the white yarn (62), Change to the skin Yarn (73)
Round 10 :
BLO: 9sc (Photo 05) (9)
Round 11 - Round 24 :
9sc (9)
Round 25 :
9sc, 1slst, Fasten off (9)
— Border round (arms) :
Info :
Working in the FLO of round 09, attach the white yarn (62): (Photo 06)
Round 1 :
9sc (9)
Round 2 :
*[1slst, 3ch]* crochet 9 times (Photo 07) , Fasten off (9)
— LEGS (make two) :
Round 1 :
Begin with 5 ch, start in 2nd chain from the hook: 1inc, 2sc, [4sc], bottom side of chain: 2sc, 1inc (photo 10, 11) (12)
Round 2 :
1sc, 1inc, 2sc, 4inc, 2sc, 1inc, 1sc (18)
Round 3 :
1inc, 4sc, *1sc, 1inc* crochet 4 times, 4sc, 1inc (24)
Round 4-Round 6 :
24sc (24)
Round 7 :
6sc, 6dec, 6sc (18)
Round 8 :
5sc, 4dec, 5sc (14)
Round 9 :
6sc, 1dec, 6sc (13)
Round 10 - Round 11 :
13sc (13)
Info :
Tips: Prepare insoles. Draw an outline around the sole on the cardboard (if you plan to wash the toy, then it’s better to use a plastic sheet, for example, plastic cover from regular jars) (Photo 12)
Round 12 :
BLO: 6sc, 1dec, 5sc (Photo 14) (12)
Round 13 - Round 19 :
12sc (12)
Round 20 :
1inc, 11sc (13)
Round 21 - Round 22 :
13sc (13)
Round 23 :
1inc, 12sc (14)
Round 24 - Round 29 :
14sc (14)
Round 30 :
1inc, 13sc (15)
Round 31 - Round 34 :
15sc (15)
Round 35 :
15sc, 1slst, Fasten off (15)
Border round :
Working in the FLO of round 11, attach the white yarn (62) (Photo 15)
Round 1 :
13sc (13)
Round 2 :
*[1slst, 3ch]* crochet 13 times, Fasten off (13)
— BODY :
Info :
You can choose the 1st or 2nd option. Option 1 : insert wire into crocheted body doll - Use 2 wires 28 cm long and bend it as shown in the photo 18, 19. Option 2: only insert a stick (or wire) to splint a doll's neck. Prepare a wooden stick (or wire) about 9 cm (Photo 20)
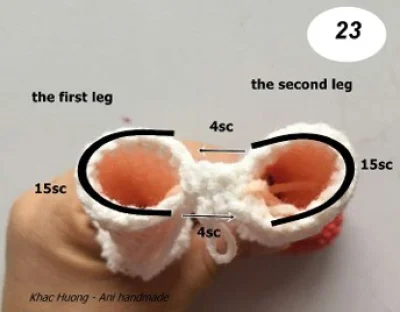
Round 36 :
15sc (around the 1st leg), 4sc (along the chain), 15sc (around the 2rd leg), 4sc (along the chain) (Photo 23) (38)
Round 37 :
*2sc, 1inc* crochet 2 times, 1inc, 22sc, *1inc, 2sc* crochet 3 times (44)
Round 38 :
*4sc, 1inc* crochet 2 times, 24sc, *1inc, 4sc* crochet 2 times (48)
Round 39 - Round 44 :
48sc (48)
Round 45 :
*6sc, 1dec* crochet 6 times (42)
Round 46 :
*1dec, 5sc* crochet 6 times (36)
Info :
Cut the white yarn (62), Change to the skin yarn (73)
Round 47 :
36sc (36)
Round 48 - Round 55 :
36sc (36)
Round 56 :
start to join arms: 9sc on the body, from body and arm together 3sc, 15sc, from body and arm together 3sc, 6sc (Photo 25,26) (36)
Round 57 :
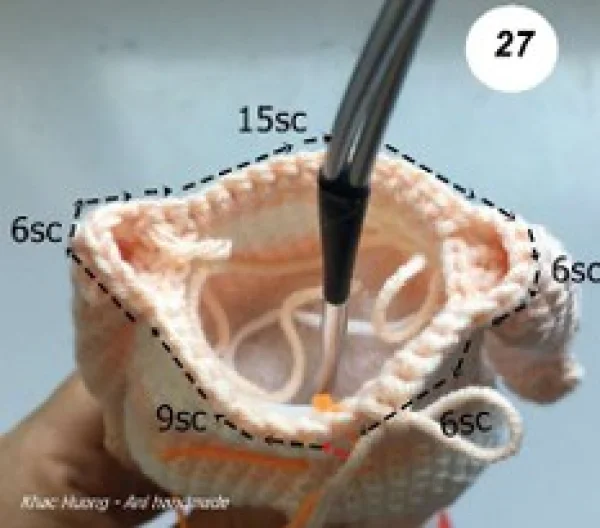
9sc, 6sc from outer sts of arm, 15sc, 6sc from outer sts of arm, 6sc (Photo 27) (42)
Round 58 :
*5sc, 1dec* crochet 6 times (36)
Round 59 :
*2sc, 1dec, 2sc* crochet 6 times (30)
Round 60 :
*3sc, 1dec* crochet 6 times (24)
Round 61 :
*1sc, 1dec, 1sc* crochet 6 times (18)
Round 62 :
*1sc, 1dec* crochet 6 times (12)
— NECK AND HEAD :
Info :
If you choose the 2nd option, insert a stick (or wire) to the doll's neck (Photo 30)
Round 63 - Round 66 :
12sc (12)
Round 67 :
12inc (24)
Round 68 :
*1sc, 1inc* crochet 12 times (36)
Round 69 :
*5sc, 1inc* crochet 6 times (42)
Round 70 :
3sc, 1inc, *6sc, 1inc* crochet 5 times, 3sc (48)
Round 71 :
*7sc, 1inc* crochet 6 times (54)
Round 72 - Round 83 :
54sc (54)
Round 84 :
*7sc, 1dec* crochet 6 times (48)
Round 85 :
3sc, 1dec, *6sc, 1dec* crochet 5 times, 3sc (42)
Round 86 :
*5sc, 1dec* crochet 6 times (36)
Round 87 :
2sc, 1dec, *4sc, 1dec* crochet 5 times, 2sc (30)
Round 88 :
*3sc, 1dec* crochet 6 times (24)
Round 89 :
1sc, 1dec, *2sc, 1dec* crochet 5 times, 1sc (18)
Round 90 :
*1sc, 1dec* crochet 6 times (12)
Round 91 :
6dec, 1slst, Fasten off (6)
Info :
Put the eyes between round 76 and 77. The distance between two eyes is 9 stitches. (photo 35) Use the skin yarn (73). Attach the yarn in to eyes (refer the photo 32, 33, 34). Then pull it strongly and knot.
— EARS (make two) :
Info :
With skin (73) color: Begin with 2ch, start in 2nd chain from the hook: [6dc], 1slst, leave a long tail to sew the ears on the head, Fasten off (Photo 45)
Info :
Sew the ears between Rd 77 and Rd 79. The space between eye and ear is 5 stitches (photo 46)
— WIG :
Info :
With the Etrofil Jeans – Yellow (59)
Round 1 :
8sc in the magic ring (8)
Round 2 :
BLO: 8inc (16)
Round 3 :
BLO: *1sc , 1inc* crochet 8 times (24)
Round 4 :
BLO:*1sc , 1inc, 1sc* crochet 8 times, DO NOT cut the yarn (32)
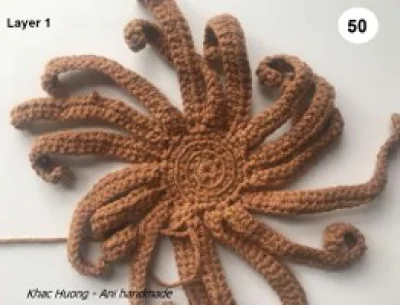
Info :
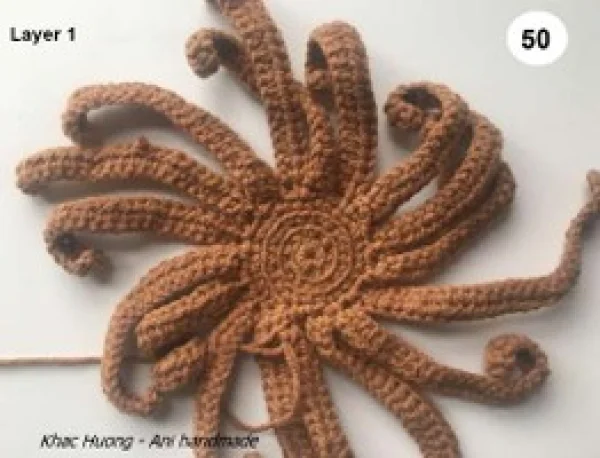
HAIR STRANDS Layer: 1 Work in the Rd 4 (Total 16 strands) (photo 48, 49, 50)
Row 1 =>13 :
23ch, start in 2nd chain from the hook: 22hdc, then crochet in this Rd 4: 1sk, 1sc
Row 14 =>16 :
28ch , start in 2nd chain from the hook: 27hdc, then crochet in this Rd 4: 1sk. 1sc
Info :
Layer 2: Work in the FLO of Rd 3 (Total 12 strands) (photo 51, 52) Row 17 =>28 : 39ch, start in 2nd chain from the hook: 38hdc, then crochet in this FLO of Rd 3: 1sk, 1sc
Info :
Layer 3: Work in the FLO of Rd 2 (Total 8 strands) (photo 53, 54) Row 29 =>36 : 39ch, start in 2nd chain from the hook: 38hdc, then crochet in this FLO of Rd 2: 1sk, 1sc
Info :
Layer 4: Work in the FLO of Rd 1 (Total 4 strands) (photo 55, 56) Row 37 =>40 : 36ch, start in 2nd chain from the hook: 35hdc, then crochet in this FLO of Rd 1: 1sk, 1sc, Fasten off and weave in the ends.
— ASSEMBLY :
Info :
For the correct placement of the wig insert a pin both through the magic ring of the cap and the magic ring of the head (photo 57).
Info :
Then align the wig in such a way that it also covers the sides of the head evenly. Pin the edge of the cap to the head (photo 58, 59).
Info :
Use matching colored sewing thread to sew (or Use the Silicon glue) the wig to the head (photo 60)
Info :
Blush your doll's cheeks (Photo 62)
— WEDDING DRESS (Upper body) :
Info :
With the White yarn (62)
Round 1 :
Begin with 41, start in 2nd chain from the hook: 40sc, turn (40)
Round 2 :
40sc, turn (40)
Round 3 :
BLO: *9sc, 1inc* crochet 4 times, turn (44)
Round 4 :
1ch , 7sc, 7ch , 8sk, 14sc, 7ch , 8sk, 7sc, turn (Photo 64, 65) (42)
Round 5 :
1ch , 1inc, 5sc, 1inc, 7sc ( into 7ch), 1inc, 12sc, 1inc, 7sc (into 7ch), 1inc, 5sc, 1inc, turn (48)
Round 6 - Round 9 :
1ch , 48sc, turn (48)
Round 10 :
1ch , 48sc, (do not turn), 1slst onto the first stich to form a circle (Photo 67) (48)
Layer 1 - Rounds 11 onwards :
Rd 11 : BLO: 2ch, *1dc, 1dc-inc* crochet 24 times , 1slst (72). Rd 12-Rd14 : 2ch , 72dc, 1slst (72). Rd15 : BLO: *2dc, 1dc-inc* crochet 24 times, 1slst (96). Rd 16-Rd 18 : 2ch, 96dc, 1slst (96). Rd 19 : BLO: 2ch: *3dc, 1dc-inc* crochet 24 times, 1slst (120). Rd 20-Rd 22 : 2ch, 120dc, 1slst (120). Rd 23 : BLO: 2ch: *4dc, 1dc-inc* crochet 24 times, 1slst (144). Rd 24-Rd27 : 2ch, 144dc, 1slst (144). Rd 28 : 2ch, *1dc, 1ch* crochet 144 times, 1slst. Rd 29 : *[1sc, 5ch, 1slst] - at 1ch of Rd 28* crochet 144 times, Fasten off and weave in the ends. (photo 71)
Layer 2 :
Working in the FLO of round 22 (layer 1) , attach the white yarn (62) (photo 73) Rd1 : 2ch, *4dc, 1dc-inc* crochet 24 times, 1slst (144). Rd 2 : 2ch, 144dc, 1slst (144). Rd 3 : 2ch, *1dc, 1ch* crochet 144 times, 1slst (144). Rd 4 : *[1sc, 5ch, 1slst] - at 1ch of Rd3* crochet 144 times, Fasten off and weave in the ends.
Layer 3 :
Working in the FLO of round 18 (layer 1) , attach the white yarn (62) (photo 75) Rd1 : *3dc, 1dc-inc* crochet 24 times, 1slst (120). Rd 2-Rd 3 : 2ch, 120dc, 1slst (120). Rd 4 : 2ch, *1dc, 1ch* crochet 120 times, 1slst (120). Rd 5 : *[1sc, 5ch, 1slst] - at 1ch of Rd4* crochet 120 times, Fasten off and weave in the ends.
Layer 4 :
Working in the FLO of round 14 (layer 1) , attach the white yarn (62) (Photo 77) Rd1 : *2dc, 1dc-inc* crochet 24 times, 1slst (96). Rd2-Rd4 : 2ch, 96dc, 1slst. Rd5 : 2ch, *1dc, 1ch* crochet 96 times, 1slst. Rd6 : *[1sc, 5ch, 1slst] - at 1ch of Rd5* crochet 96 times, Fasten off and weave in the ends.
Layer 5 :
Working in the FLO of round 10 (layer 1) , attach the white yarn (62) (Photo 79) Rd1 : 2ch, *1dc, 1dc-inc* crochet 24times , 1slst (72). Rd 2-Rd 5 : 2ch, 72dc, 1slst. Rd 6 : 2ch, *1dc, 1ch* crochet 72 times, 1slst. Rd 7 : *[1sc, 5ch, 1slst] - at 1ch of Rd6* crochet 72 times, Fasten off and weave in the ends.
Ruffle Collar :
Working in the FLO of round 2 (Upper of dress) , the white yarn (62) (Photo 81) Rd 1 : 2ch, *1dc, 1ch* crochet 40 times, 1slst (40). Rd 2 : *[1sc, 5ch, 1slst] - at 1ch of Rd1* crochet 40 times, Fasten off and weave in the ends.
Border :
Attach the white yarn(62), Starting from the right side: 1slst, *3ch, 3sk, 3slst* crochet 2 times, crochet slst in the left side (Photo 82)
Collar :
crochet all: slst, Fasten off (Photo 84) - Use 2 small buttons to sew to the back of the dress (Photo 85)
Choker :
With the White yarn (62) - *6ch start in 4rd chain from the hook: 1dc* crochet 4 times, 2ch, Fasten off (Photo 87, 88)
Shoes (make two) :
With the White yarn (62) Rd 1 : Begin with 6ch, start in 2nd chain from the hook: 1inc, 3sc, [4sc], bottom side of chain: 3sc, 1inc (14). Rd 2 : 1sc, 1inc, 3sc, 4inc, 3sc, 1inc, 1sc (20). Rd 3 : 1inc, 5sc, *1sc, 1inc* crochet 4 times, 5sc, 1inc (26). Rd 4 : BLO:26sc (26). Rd 5-Rd 6 : 2ch,26hdc, 1slst (26). Rd 7 : 2ch, 8hdc, 5hdc2tog, 8hdc, 1slst (21). Rd 8 : 10ch, 10sk, 1sc, 10ch, 10sk, 1slst, Fasten off and weave in the ends.
Flowers (make 5) :
With the pink yarn (36) and light pink (18) :14ch, in third chain from hook: [dc, 1ch, 1hdc, 1ch, 1sc, slst] in the same stitch, slst in next stitch, *[1sc,1ch, 1hdc, 1ch, 1dc, 1ch, 1hdc, 1ch, 1sc, 1slst] all in one stitch, slst in next stitch, repeat from * down the entire chain. You should end up with 5 petals. Fasten off leaving long tail.
Flowers assembly :
I used a piece of 20 gauge jewelry wire and green washi tape, pearl beads (Photo 99) - Cut a long piece of wire (about 16cm) and fold it in half. Slip it through the of your flower. (Photo 100, 101) - Secure and wrap with washi tape then group flowers as bouquet (Photo 102 onwards)
Wedding Veils - Crown :
Cut a long piece of wire (16cm) and fold it in half (Photo 108) - Use the white yarn (62) crochet to hook through the wire (Photo 109, 110) Rd 1 : 17sc, turn (17). Rd 2-Rd 3 : 1ch, 17sc, turn (17). Rd 4 : 2ch, *2sk, [3tr, 1picot, 3tr] in the same stiches, 2sk, 1sc* crochet 3 times, Fasten off and weave in the ends. (Photo 112, 113) Picot: 3ch, insert hook between the front and back lps previous st, yo, and pull through to create picot (Photo refs). Assembly steps for veil: Fold 2/3 of the tulle lengthwise, divide horizontally into 3 equal parts, Use the white thread to sew the middle part (Photo 115, 116). Connect the tulle to the crown with together (Photo 117) and finish with button or small pearl (Photo 118).
ASSEMBLY INSTRUCTIONS
- Attach wig to head by aligning the cap’s magic ring with the head’s magic ring and pinning through both; sew the cap edge to the head evenly (photo 57-60).
- Sew arms to the body by joining stitches indicated in Round 56: work 9sc on the body, join body-to-arm 3sc, then continue 15sc across and join the other arm as indicated.
- Connect the two legs from the back by aligning the connection point to the middle then crochet 4ch from the second leg to the first leg with white yarn (62) to join (photo 21,22), insert wire or stick if using option 1/2 before closing body.
- Assemble the dress by layering the ruffle layers (Layer 1–5) into the FLO rounds specified, attach ruffle collar and sew small buttons to back of the dress (photo 71,85).
- Attach the veil to the crown and secure crown to the wig by sewing or tack-stitching in place; add pearl or bead decorations to crown and secure bouquet wire into hand.
COMMON MISTAKES TO AVOID
Skipping stitch markers during spiral rounds causes you to lose track of the beginning; place a marker at the start of each round and move it up as you work.
Changing yarn colors without securing ends can cause loose joins later; weave in ends or secure with small knots and tidy joins before continuing.
Overstuffing limbs and head makes seams bulge and distorts shaping; add stuffing gradually and shape as you go for even firmness.
Not counting stitches after increases and decreases leads to incorrect shaping; count your stitches at the end of each round to ensure you match the pattern.
This Farrah bridal amigurumi pattern is a labor of love with layered hair, delicate ruffles and tiny bridal details. Make it as a keepsake gift or a showpiece for your handmade collection. The full pattern includes photos, assembly tips, and accessory instructions to guide you every step. 🧵💖👰
FREQUENTLY ASKED QUESTIONS
What size will the finished piece be?
The finished amigurumi measures approximately 32 cm tall when using the recommended yarn and 2.3 mm hook, as shown in the pattern photos.
Can I use different yarn weights for this pattern?
Yes, you can use different yarn weights, but it will affect final size and proportion; adjust hook size accordingly and test a gauge swatch before starting.
Do I need prior crochet experience for this pattern?
This pattern is rated intermediate, so basic knowledge of crochet stitches and shaping in the round is recommended for best results.
How long does this project typically take to complete?
Because of the layered wig, dress ruffles and assembly, most crocheters take 12+ hours to complete this project across several sessions.
GET MORE FREE PATTERNS
Join 50,000+ crafters and get a new free pattern in your inbox every week.