FREE CROCHET PATTERN
Dragon Toothless Amigurumi Pattern
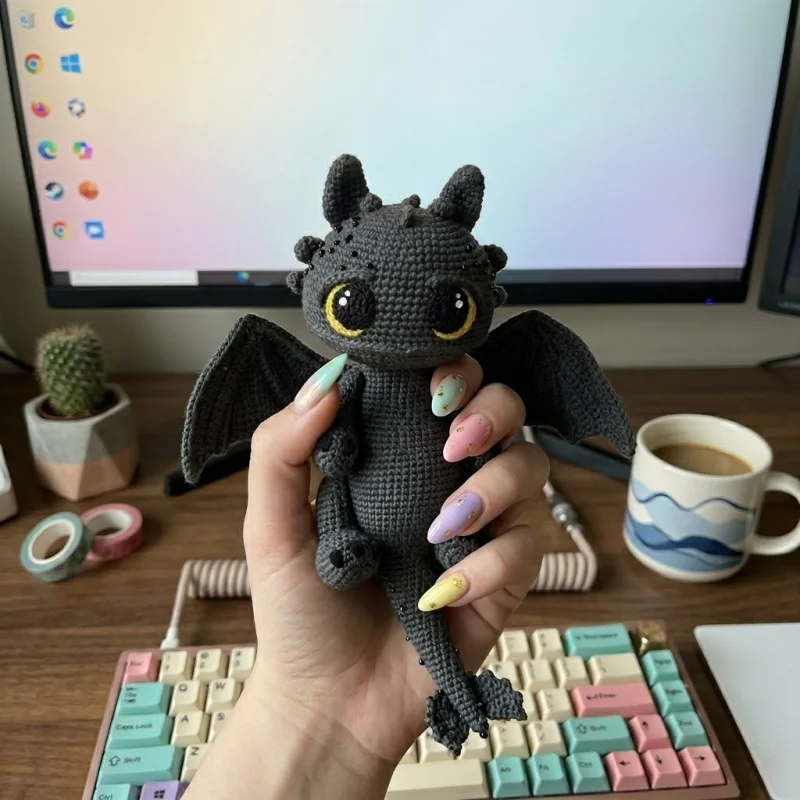
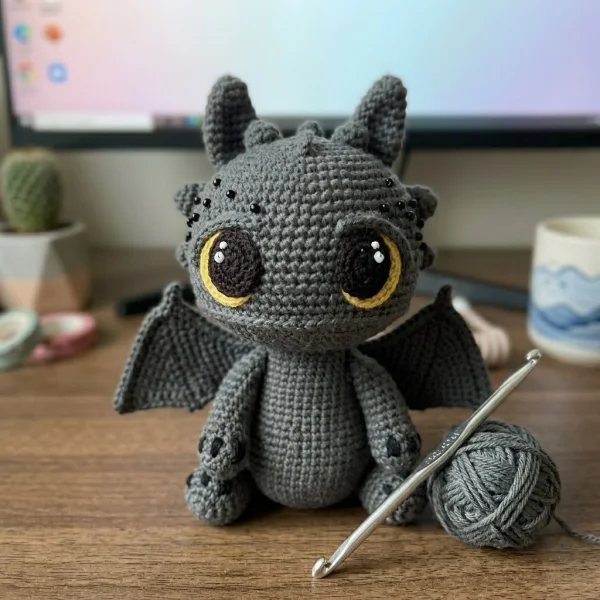
Make your own adorable Toothless dragon with this complete crochet pattern. You will find step-by-step rounds, clear materials and tools lists, and assembly tips to guide you from start to finish. The pattern includes instructions for the head, body, legs, wings, tail, spines and finishing touches. Perfect for crocheters ready to build a detailed, poseable amigurumi.

Cute Companion
An adorable friend to cherish, handcrafted with love to bring comfort and joy for years to come.
ABOUT THIS PATTERN
This pattern creates a detailed, poseable Toothless-inspired dragon amigurumi approximately 30cm tall using fine and lace weight yarns. It includes complete instructions for crocheting the head, body, legs, wings, tail, eyelids, and multiple spines. The design uses wire frames for posability and offers options for plastic joints or cotter pins for secure limb attachment.
You'll receive step-by-step rounds, materials and tools lists, and finishing tips including tinting and bead decorations. The pattern combines regular amigurumi techniques with some framed elements for realistic wings and tail.
WHY YOU'LL LOVE IT
I absolutely love this pattern because it brings a beloved dragon character to life with thoughtful shaping and poseable elements. I enjoy the combination of classic amigurumi techniques with wire-framed wings and tail that let you pose your creation. The little decorative details like spines and painted eyes make each finished toy full of personality. I also like that the pattern includes options for different joint types so you can choose the fastening method that works best for your project.
💡 SWITCH THINGS UP
I love how easily this pattern adapts to creative changes: swap the dark gray for charcoal or soft gray to change the mood of your dragon.
I sometimes use a bulkier yarn and a larger hook to make a chunkier, cuddlier version; adjust wire thickness to suit the scale.
I often replace the painted pupils with tiny safety eyes or layered felt pieces for a different look and simpler finishing.
I like adding embroidery or tiny felt teeth to make an angrier expression, or lower the eyelids for a sleepy, gentle face.
Try making mini keychain versions by using finer thread and a 1.0mm hook and skipping the internal wire frames.
I also enjoy dressing my dragons: crochet a tiny scarf, saddle, or cape to give each one personality and color contrast.
For a posable feel, experiment with different wire gauges in the wings and tail; thinner wire gives more flexibility, thicker wire holds a stronger pose.
I sometimes sew on small seed beads along the spine for a sparkly texture; use fishing line to secure them neatly.
If you prefer a seamless look, use felt applique for the eyes instead of painted details, then glue and sew into place for a matte finish.
Don’t be afraid to mix yarn textures: a slightly fuzzy yarn for the belly can add visual interest while keeping the rest smooth for clean shaping.
IMPORTANT NOTES
- Use stitch markers to keep track of the beginning of rounds and align the marker in the center back as instructed.
- Stuff gradually and shape as you go: stuff feet and lower parts more firmly and necks/upper parts more lightly for correct proportions.
- When inserting wires and joints, follow the specified diameters and lengths and wrap/secure frames where they meet to prevent sharp edges.
- Mark joint positions with contrasting thread where instructed to ensure correct placement of plastic joints or cotter pins.
- Do not cut the yarn at the end of the tail; continue to crochet the body as the tail and body are worked continuously.
🧶 Materials
- Fine/4ply yarn Yarn Art Baby Cotton 50g/165m (50% cotton, 50% acrylic) - Color 454 (dark gray) - quantity as needed
- Fine/4ply yarn Yarn Art Baby Cotton 50g/165m (50% cotton, 50% acrylic) - Color 460 (black) - quantity as needed
- Lace weight/1ply yarn Alpina Lena 50g/280m (100% mercerized cotton) - Color 10 (yellow) - for eyes
- Toy stuffing material (fiberfill) - sufficient to stuff head, body, legs and tail
- Seed beads for decoration - small quantity
- Dry pastel black color for tinting wings and tail fins
Tools Required
- Crochet hook size 2 mm
- Crochet hook size 1.25 mm
- Wire for frame: diameter 0.9mm - lengths 23cm (2 pcs), 19cm (4 pcs), 13cm (2 pcs)
- Wire for frame: diameter 1.6mm - length 45cm
- Plastic joints size 25mm for hind legs (2 pcs)
- Plastic joints size 15mm for forelegs (2 pcs)
- Cotter pin fastening parts: disks size 25mm (4 pcs), disks size 15mm (4 pcs), T-shaped cotter pins 20*2 (4 pcs)
- Round nose pliers
- Hot glue gun
- Beading needle and needle with a blunt end
- Sewing pins
- Scissors
- Fishing line or nylon thread for sewing seed beads
- Textile paint in black and white for pupils and glints
- Yarn needle for sewing pieces
- Stitch markers (recommended)
📖 Abbreviations
- MR - magic ring
- sc - single crochet
- inc - increase (2 sc in one stitch)
- dec - decrease (2 sc together)
- hdc - half double crochet
- hdcinc - half double crochet increase (2 hdc in one stitch)
- dc - double crochet
- ch - chain
- t-ch - turning chain (when work in rows)
- sl st - slip stitch
- BLO - back loops only
- Bobble st - crochet unfinished dc stitches in one stitch with a common top
- (...) - number in brackets means a number of stitches in a round
- (...)*N - repeat instruction in brackets N times
🧩 Pattern Steps
— Head :
Info :
Crochet with dark gray yarn, hook size 2 mm. The marker of the beginning of the round passes exactly in the middle of the back. If necessary, crochet extra stitches. Stuff as you go.
Round 1 :
6sc in a MR (6)
Round 2 :
6inc (12)
Round 3 :
(1sc, inc)*6 (18)
Round 4 :
1sc, inc, (2sc, inc)*5, 1sc (24)
Round 5 :
(3sc, inc)*6 (30)
Round 6 :
2sc, inc, (4sc, inc)*5, 2sc (36)
Round 7 :
(5sc, inc)*6 (42)
Round 8 :
3sc, inc, (6sc, inc)*5, 3sc (48)
Round 9 :
(7sc, inc)*6 (54)
Round 10 :
4sc, inc, (8sc, inc)*5, 4sc (60)
Round 11 :
(9sc, inc)*6 (66)
Round 12 :
66sc (66)
Round 13 :
5sc, inc, (10sc, inc)*5, 5sc (72)
Round 14-21 :
72sc (8 rounds)
Round 22 :
18sc, (BLO 36sc), 18sc (72)
Round 23 :
5sc, dec, (10sc, dec)*5, 5sc (66)
Round 24 :
(9sc, dec)*6 (60)
Round 25 :
4sc, dec, (8sc, dec)*5, 4sc (54)
Round 26 :
(7sc, dec)*6 (48)
Round 27 :
2sc, dec, (4sc, dec)*7, ch3
Round 28 :
skip 2 stitches before marker and 2 stitches after marker, next crochet 1sc, dec, (3sc, dec)*6, 3sc, 1sc on the chain (32)
Round 29 :
2sc on the chain, dec, (2sc, dec)*7 (24)
Round 30 :
(2sc, dec)*6 (18)
Round 31 :
(1sc, dec)*6 (12)
Round 32 :
6dec (6)
Infos :
Cut the yarn, fasten off, tighten the hole. We will use the hole in round 27-28 to bring the wire frame from the body into the head. Attach the dark gray yarn to the first unused front loop of round 21 (keep the hole away from you) and crochet: 17sc, 2hdcinc, 17sc. Cut the yarn, fasten off, hide the ends inside.
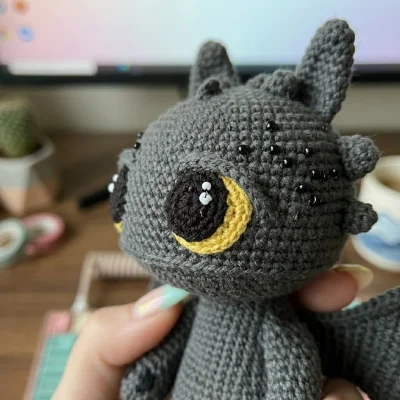
— Eyes (make 2) :
Info :
Crochet with 1ply yarn Alpina Lena of yellow color, hook size 1.25mm.
Round 1 :
6sc in a MR (6)
Round 2 :
6inc (12)
Round 3 :
(1sc, inc)*6 (18)
Round 4 :
(inc, 2sc)*6 (24)
Round 5 :
3sc, 2hdcinc, 2sc (short round)
Infos :
Cut the yarn, fasten off, weave in the ends (bring all the ends to the front side). We will attach the eyes to the head with the wrong side out, as it is less relief than the front.
Info :
On the wrong side of the eye, draw a pupil with black textile paint and a glare with white paint. HDC increases in round 5 are located in the upper inner corner of the eyes (marked in the photo).
Info :
PS. If desired, eyes, pupils and glare can be cut out of felt and glued together. Leave the eyes on the head fixed with sewing pins. We will sew and glue all the pieces at the very end, when we assemble all the other pieces and place them in the places we like.
Info :
When decorating the head focus on 2hdcinc of edging of the head. This is the center of the face.
— Eyelids (make 2) :
Info :
Crochet with dark gray yarn, hook size 2 mm.
Round 1 :
Ch9, start in the second chain from the hook: sl st, 6sc, sl st.
Info :
Cut the yarn, leaving a long end for sewing pieces. The mood of the dragon depends on the location of the eyelids. You can make him angry or a little sad. Try several options for the location of the eyelids and choose what you like best.
— Ears (make 2) :
Info :
Crochet with dark gray yarn, hook size 2 mm. The marker of the beginning of the round passes on the side in the middle. If necessary, crochet extra stitches. Do not stuff.
Round 1 :
6sc in a MR (6)
Round 2 :
(1sc, inc)*3 (9)
Round 3 :
4sc, inc, 4sc (10)
Round 4 :
4sc, inc, 5sc (11)
Round 5 :
5sc, inc, 5sc (12)
Round 6 :
(inc, 5sc)*2 (14)
Round 7-8 :
14sc (2 rounds)
Round 9 :
6sc, dec, 6sc (13)
Round 10 :
5sc, dec, 6sc (12)
Info :
Fold in half and crochet through both sides 6sc. Cut the yarn, leaving a long end for sewing pieces.
— Spines 1 (make 2) :
Info :
Crochet with dark gray yarn, hook size 2 mm.
Round 1 :
6sc in a MR (6)
Round 2 :
6sc (6)
Infos :
Cut the yarn, leaving a long end for sewing pieces. Fix with sewing pins to the head (see the location in the photo).
— Spines 2 (make 2) :
Info :
Crochet with dark gray yarn, hook size 2 mm. Do not stuff.
Round 1 :
6sc in a MR (6)
Round 2 :
(2sc, inc)*2 (8)
Round 3 :
8sc (8)
Infos :
Fold in half and crochet through both sides 4sc. Cut the yarn, leaving a long end for sewing pieces. Fix with sewing pins to the head (see the location in the photo).
— Spines 3 (make 2) :
Info :
Crochet with dark gray yarn, hook size 2 mm. Do not stuff.
Round 1 :
6sc in a MR (6)
Round 2 :
6sc (6)
Round 3 :
(1sc, dec)*2 (4)
Infos :
Cut the yarn, leaving a long end for sewing pieces. Fix with sewing pins to the head (see the location in the photo).
— Hind Legs :
Info :
Crochet with dark gray yarn, hook size 2 mm. Ch8, start on the second chain from the hook:
Round 1 :
6sc, 4sc in the last chain, on the other side of the chain: 5sc, inc (17)
Round 2 :
inc, 5sc, 4inc, 5sc, 2inc (24)
Round 3 :
1sc, inc, 5sc, (1hdc, hdcinc)*4, 5sc, (1sc, inc)*2 (31)
Round 4 :
9sc, (3-dc Bobble st in black, 2sc in dark gray)*4, 9sc - short round (you may have a different number of stitches).
Info :
Move the marker. It should pass at the back, in the center of the heel. Guideline - a straight line of the foundation chain. Align it in the process by crocheting extra stitches.
Round 5 :
31sc (31)
Round 6 :
(4sc, dec)*2, 7sc, (dec, 4sc)*2 (27)
Round 7 :
6sc, dec, 5sc, dec, 4sc, dec, 6sc (24)
Round 8 :
6sc, 6dec, 6sc (18)
Round 9-13 :
18sc (5 rounds)
Info :
Begin to gradually stuff the leg with fiberfill. While stuffing tightly only the lower part (foot).
Round 14 :
(5sc, inc)*3 (21)
Round 15-16 :
21sc (2 rounds)
Info :
Left hind leg.
For plastic joints :
17. 13sc, ch2, skip 2sc, 6sc (21)
Round 18 :
13sc, 2sc on the chain, 6sc (21)
Round 19 :
21sc (21)
For cotter pins legs fastening :
17-19. 21 sc (3 rounds)
Info :
Right hind leg.
For plastic joints :
17. 6sc, ch2, skip 2sc, 13sc (21)
Round 18 :
6sc, 2sc on the chain, 13sc (21)
Round 19 :
21sc (21)
For cotter pins legs fastening :
17-19. 21sc (3 rounds)
Info :
Select the diameter of the fastening: fold the leg in half and select a disk/joint that occupies the entire internal space of the leg (the disk/joint D25mm is suitable for me). When using a cotter pin, move 2 rounds down and away from the marker: 7sc to the left (for the right hind leg) and 7sc to the right (for the left hind leg) and insert the disc with the cotter pin. Continue to gradually stuff the leg with fiberfill. Stuff the upper part slightly.
Round 20 :
(5sc, dec)*3 (18)
Round 21 :
(1sc, dec)*6 (12)
Round 22 :
6dec (6)
Infos :
Cut the yarn. Tighten the hole and hide the ends inside. Pay attention to the photo below. As an example, I showed you two ways of fastening: cotter pin - on the right foot and plastic joint - on the left. Choose the option you like and use it for the hind and forelegs.
— Forelegs :
Info :
Crochet with dark gray yarn, hook size 2 mm. The marker of the beginning of the round should pass at the back, in the center. If necessary, crochet extra stitches.
Round 1 :
6sc in a MR (6)
Round 2 :
6inc (12)
Round 3 :
(1sc, inc)*6 (18)
Round 4 :
5sc, (3-dc Bobble st in black, 2sc in dark gray)*3, 4sc
Round 5-7 :
18sc (3 rounds)
Round 8 :
8sc, dec, 8sc (17)
Round 9 :
17sc (17)
Round 10 :
5sc, dec, 3sc, dec, 5sc (15)
Round 11 :
15sc (15)
Round 12 :
6sc, dec, 7sc (14)
Round 13 :
6sc, 2inc, 6sc (16)
Round 14 :
dec, 12sc, dec (14)
Round 15 :
6sc, 2inc, 6sc (16)
Round 16 :
dec, 12sc, dec (14)
Info :
Begin to gradually stuff the leg with fiberfill. While stuffing tightly only the lower part.
Info :
Left foreleg.
For plastic joints legs fastening :
17. 6sc, 2inc, 1sc, ch2, skip 2sc, 3sc (16)
Round 18 :
dec, 9sc, 2sc on the chain, 1sc, dec (14)
For cotter pins legs fastening :
17. 6sc, 2inc, 6sc (16)
Round 18 :
dec, 12sc, dec (14)
Info :
Right foreleg.
For plastic joints legs fastening :
17. 3sc, ch2, skip 2sc, 1sc, 2inc, 6sc (16)
Round 18 :
dec, 1sc, 2sc on the chain, 9sc, dec (14)
For cotter pins legs fastening :
17. 6sc, 2inc, 6sc (16)
Round 18 :
dec, 12sc, dec (14)
Infos :
Further, the right and left forelegs are crocheted in the same way. 19. (5sc, dec)*2 (12). 20. 6dec (6). Cut the yarn. Tighten the hole and hide the ends inside.
— Wings (make 2) :
Info :
Take dark gray yarn, hook size 2 mm, wire with a diameter of 0.9mm (23cm-2pcs., 19cm-4pcs., 13cm-2pcs). Better take it with a margin. Bend the end of each wire as shown in the photo. In the process be careful, work in rows. There will be rows where we will make t-ch and turn and rows where we will skip 1 stitch.
Info :
Ch28, start from the second chain on the hook, working around the wire 23cm long (start from the bend end).
Round 1 :
27sc (27), turn. After that do not work with the wire.
Round 2 :
from the 2nd stitch: 8sc, dec, 12sc, dec (22), turn.
Round 3 :
from the 2nd stitch: 11sc, dec, 6sc (18), turn.
Round 4 :
from the 2nd stitch: 16sc (16), turn.
Round 5 :
from the 2nd stitch: 13sc (13), turn.
Round 6 :
from the 2nd stitch: 12sc (12), turn.
Round 7 :
from the 2nd stitch: 9sc (9), turn.
Round 8 :
from the 2nd stitch: 8sc (8), turn.
Round 9 :
from the 2nd stitch: 4sc (4), turn.
Round 10 :
from the 2nd stitch: 3sc (3), ch3, turn.
Info :
Next, crochet with a wire 19cm long (start from the bend end).
Round 11 :
from the 2nd chain: 2sc, 3sc, +1sc into the corner, 3sc along stitches of the previous row, +1sc into the corner, 2sc along stitches of the previous row, +1sc into the corner, 2sc along stitches of the previous row, +1sc into the corner, 2sc along stitches of the previous row (18), turn.
Round 12 :
from the 2nd stitch: 15sc, dec (16), turn.
Round 13 :
from the 2nd stitch: 7sc (7), turn.
Round 14 :
from the 2nd stitch: 6sc (6), turn.
Round 15 :
from the 2nd stitch: 5sc, +1sc into the corner, 4sc along stitches of the previous row (10), turn.
Round 16 :
from the 2nd stitch: 9sc (9), t-ch, turn.
Round 17 :
from the 2nd stitch: 9sc, +1sc into the corner, 3sc along stitches of the previous row (13), turn (1 stitch of the previous row remains unused!)
Round 18 :
from the 2nd stitch: 12sc (12), t-ch, turn.
Round 19 :
from the 2nd stitch: 9sc (9), turn.
Round 20 :
from the 2nd stitch: 8sc (8), t-ch, turn.
Round 21 :
from the 2nd stitch: 5sc (5), turn.
Round 22 :
from the 2nd stitch: 3sc, inc (5), 3ch, turn.
Info :
Next, crochet with a wire 19cm long (start from the bend end).
Round 23 :
from the 2nd chain: 2sc, 5sc, +1sc into the corner, 3sc along stitches of the previous row, +1sc into the corner, 3sc along stitches of the previous row, +1sc into the corner, 1sc along stitch of the previous row, +2sc into the corners of the previous rows (19), turn.
Round 24 :
from the 2nd stitch: 18sc (18), turn.
Round 25 :
from the 2nd stitch: 17sc (17), turn.
Round 26 :
from the 2nd stitch: 16sc (16), turn.
Round 27 :
from the 2nd stitch: 14sc (14), turn.
Round 28 :
from the 2nd stitch: 13sc (13), t-ch, turn.
Round 29 :
from the 2nd stitch: 11sc (11), turn.
Round 30 :
from the 2nd stitch: 9sc, inc (11), t-ch, turn.
Round 31 :
from the 2nd stitch: 9sc (9), turn.
Round 32 :
from the 2nd stitch: 7sc, inc (9), 3ch, turn.
Info :
Next crochet with a wire 13cm long (start from the bend end).
Round 33 :
from the 2nd chain: 2sc, 8sc (8), turn.
Round 34 :
from the 2nd stitch: 4sc (4), turn.
Round 35 :
from the 2nd stitch: 3sc (3), turn.
Round 36 :
from the 2nd stitch: 2sc, +1sc into the corner, 4sc along stitches of the previous row (7), turn.
Round 37 :
from the 2nd stitch: 4sc, dec (5), t-ch, turn.
Round 38 :
from the 2nd stitch: 5sc (5), t-ch, turn.
Round 39 :
from the 2nd stitch: 5sc (5)
Infos :
Cut the yarn, leaving a long end for sewing pieces. Bend the wire frame along the upper side of the wing. Make an edging along the frame. Attach the dark gray yarn to the marked points in the photo (the exit point of the first wire) and crochet sc along the upper side of the wing. The green arrow shows the direction of crocheting.
— Tail :
Info :
Crochet with dark gray yarn, hook size 2 mm. The marker of the beginning of the round should pass at the back, in the center. If necessary, crochet extra stitches.
Round 1 :
4sc in a MR (6)
Round 2-4 :
4sc (3 rounds)
Round 5 :
(1sc, inc)*2 (6)
Round 6-8 :
6sc (3 rounds)
Round 9 :
(2sc, inc)*2 (8)
Round 10-11 :
8sc (2 rounds)
Round 12 :
(3sc, inc)*2 (10)
Round 13 :
10sc (10)
Round 14 :
2sc, inc, 4sc, inc, 2sc (12)
Round 15 :
12sc (12)
Round 16 :
(5sc, inc)*2 (14)
Round 17 :
14sc (14)
Round 18 :
3sc, inc, 6sc, inc, 3sc (16)
Round 19 :
16sc (16)
Round 20 :
(7sc, inc)*2 (18)
Round 21-22 :
18sc (2 rounds)
Round 23 :
4sc, inc, 8sc, inc, 4sc (20)
Round 24-26 :
20sc (3 rounds)
Round 27 :
(9sc, inc)*2 (22)
Round 28-30 :
22sc (3 rounds)
Round 31 :
5sc, inc, 10sc, inc, 5sc (24)
Round 32-33 :
24sc (2 rounds)
Round 34 :
(11sc, inc)*2 (26)
Round 35-36 :
26sc (2 rounds)
Round 37 :
6sc, inc, 12sc, inc, 6sc (28)
Round 38 :
28sc
Round 39 :
(13sc, inc)*2 (30)
Infos :
Do not cut the yarn. We will crochet the body. Prepare a wire frame. We need a wire with a diameter of 1.6mm and 45cm long. Bend one end, as shown in the photo. Insert the frame into the tail and stuff it.
— Body :
Info :
Continue crocheting from the tail. The marker of the beginning of the round passes in the back in the middle. If necessary, crochet extra stitches. Start counting rounds from the beginning for convenience. Focus on 4 inc in round 1.
Round 1 :
11sc, inc, 1sc, 4inc, 1sc, inc, 11sc (36)
Round 2 :
6sc, inc, 22sc, inc, 6sc (38)
Round 3 :
14sc, inc, 8sc, inc, 14sc (40)
Round 4 :
10sc, inc, 18sc, inc, 10sc (42)
Round 5 :
3sc, inc, (6sc, inc)*5, 3sc (48)
Round 6 :
48sc (48)
Round 7 :
(7sc, inc)*6 (54)
Round 8-9 :
54sc (2 rounds)
Info :
In round 10 crochet the holes for the hind legs joints fastening and mark the place for the cotter pins fastening.
For plastic joints :
Round 10: 13sc, ch2, skip 2sc, 24sc, ch2, skip 2sc, 13sc (54)
Round 11 :
13sc, 2sc on the chain, 24sc, 2sc on the chain, 13sc (54)
For cotter pins :
Round 10: 54sc (mark space between stitches 14 and 15 and stitches 40 and 41 with a thread in a contrasting color for convenience) (54)
Round 11 :
54sc (54)
Round 12-16 :
54sc (5 rounds)
Round 17 :
8sc, dec, (16sc, dec)*2, 8sc (51)
Round 18 :
20sc, dec, 7sc, dec, 20sc (49)
Info :
Insert the cotter pins / joints of the hind legs into the marked points / holes of ch2 in the body and twist / secure.
Round 19 :
49sc (49)
Round 20 :
20sc, dec, 5sc, dec, 20sc (47)
Round 21 :
47sc (47)
Round 22 :
21sc, dec, 1sc, dec, 21sc (45)
Round 23 :
(13sc, dec)*3 (42)
Round 24 :
42sc (42)
Round 25 :
6sc, dec, (12sc, dec)*2, 6sc (39)
Round 26 :
39sc (39)
Round 27 :
(11sc, dec)*3 (36)
Info :
In round 28 crochet the holes for the wings frames, forelegs joints fastening and mark the place for the cotter pins fastening.
For plastic joints :
Round 28: 3sc, ch1, skip 1sc, 4sc, ch2, skip 2sc, 16sc, ch2, skip 2sc, 4sc, ch1, skip 1sc, 3sc (36) - don't confuse! Ch1 - for the wings frames, ch2 - for the plastic joints.
Round 29 :
3sc, 1sc on the chain, 4sc, 2sc on the chain, 16sc, 2sc on the chain, 4sc, 1sc on the chain, 3sc (36)
For cotter pins :
Round 28: 3sc, ch1, skip 1sc, 28sc, ch1, skip 1sc, 3sc (36) (mark space between stitches 9 and 10 and stitches 27 and 28 with a thread in a contrasting color)
Round 29 :
3sc, 1sc on the chain, 28sc, 1sc on the chain, 3sc (36)
Round 30 :
8sc, dec, 16sc, dec, 8sc (34)
Round 31 :
34sc (34)
Round 32 :
(15sc, dec)*2 (32)
Round 33 :
32sc (32)
Info :
Insert the cotter pins / joints of the forelegs into the marked points / holes of ch2 in the body and twist / secure (in the same way as for the hind legs).
Round 34 :
7sc, dec, 14sc, dec, 7sc (30)
Info :
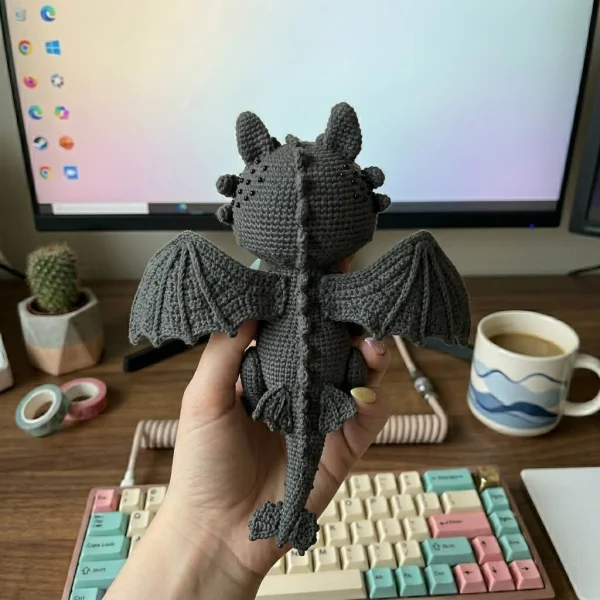
Insert the wire frame of the wings into the holes in round 28, connect it with the body frame, wrap it with insulating tape. Sew the wings to the back.
Round 35 :
4sc, dec, (8sc, dec)*2, 4sc (27)
Round 36 :
(7sc, dec)*3 (24)
Round 37 :
24sc (24)
Infos :
It is not necessary to stuff the neck tightly. Cut the yarn, leaving a long end for sewing pieces. Pass the wire frame into the hole on the head in rounds 27-28, and sew the head to the body, as shown in the photo.
— Tail Fin (make 2) :
Info :
Crochet with dark gray yarn, hook size 2 mm. Ch13, start from the second chain on the hook, work in rows in back loops:
Round 1 :
12sc (12), ch3, turn
Round 2 :
from the 2nd chain: 2sc, 11sc (13), turn.
Round 3 :
from the 2nd stitch: 12sc (12), ch3, turn
Round 4 :
from the 2nd chain: 2sc, 11sc (13), turn.
Round 5 :
from the 2nd stitch: 12sc (12), ch3, turn
Round 6 :
from the 2nd chain: 2sc, 11sc (13)
Infos :
Cut the yarn, leaving a long end for sewing pieces. Fix the tail fins to the tip of the tail (see photo) and sew.
— Spines (make 16) :
Info :
Crochet with dark gray yarn, hook size 2 mm - 4sc in a MR.
Info :
Pull the ring. Cut the yarn, leaving a long end for sewing pieces. Attach the spines to the tail, body and head (see photo) and sew. Sew on seed beads if desired.
Info :
Tint the wings and tail fins with black dry pastel.
ASSEMBLY INSTRUCTIONS
- Pass the wire frame from the body into the hole in the head (use the hole created in rounds 27-28 of the head), align and sew the head securely to the body using the long yarn tail.
- Insert and secure the cotter pins or plastic joints for hind legs and forelegs into the marked ch2 holes in rounds 10 and 28 of the body, then twist/secure according to the joint type before final stuffing.
- Bend and position the wing wire frames, insert them through the holes in round 28 of the body, connect the wing frames to the body frame, wrap with insulating tape and sew the wings to the back.
- Pin and sew ears, eyelids, spines and tail fins in the locations shown in the photos, using sewing pins for placement before final stitching; hide ends inside.
- Paint pupils on the wrong side of the crocheted yellow eyes with black textile paint and add white highlights; attach eyes to the head with sewing pins, then sew and glue when assembling all pieces.
COMMON MISTAKES TO AVOID
Not aligning the beginning-of-round marker to the middle of the back can make the body and head asymmetrical; move the marker and add extra stitches as needed to keep the marker centered.
Forgetting the extra (shift) stitch at the end of a round will misplace your marker; always crochet one extra single crochet at the end of the round and shift the marker by one stitch so the rounds line up correctly.
Insufficient or uneven stuffing causes lumpy or misshapen parts; stuff gradually, fill the lower parts tightly first (feet) and shape the upper parts lightly for smooth contours.
Skipping the instruction to use the hole in rounds 27-28 of the head for the wire frame will prevent proper frame insertion; follow the rounds exactly and use the specified hole to pass the body wire into the head.
Not marking the cotter pin or joint positions will cause misaligned limbs; mark the places for joints with a contrasting thread as instructed and insert the cotter pins or plastic joints before final stuffing.
This Dragon Toothless amigurumi pattern guides you through creating a detailed, poseable dragon with framed wings and tail. 🧶 You will crochet eyes, eyelids, ears, spines, and choose between plastic joints or cotter pins for sturdy limb attachment. 🧵 Finish with tinting and optional bead details to bring your dragon to life. ✨

FREQUENTLY ASKED QUESTIONS
What size will the finished piece be?
The size of the finished toy when using the indicated materials is about 30cm.
Can I use different yarn weights for this pattern?
Yes, you can use different yarn weights, but this will affect the final size and the required hook. Adjust wire sizes and joint diameters accordingly for a well-proportioned result.
Do I need prior crochet experience for this pattern?
This pattern is rated intermediate and assumes familiarity with amigurumi basics such as magic ring, increases, decreases, working in rounds, and some shaping and assembly skills.
How long does this project typically take to complete?
Most crocheters complete this project in 12-15 hours across multiple sessions, though exact time depends on experience level and how much detailing you add.
What fastening options are available for the limbs?
The pattern provides options for plastic joints (25mm hind, 15mm forelegs) or cotter pin fastening with disks; instructions include where to mark and insert each type.
GET MORE FREE PATTERNS
Join 50,000+ crafters and get a new free pattern in your inbox every week.